Hardware setup
Two computers (PC) are necessary to use the SimpleGazeTracker. The first PC grabs ocular image and estimate gaze position (Recorder PC). The other PC presents stimuli to a participant (Presentation PC).
1. Connect the Recorder PC and Presentation PC with a LAN cable. Assign a fixed IP address to each PC. It is recommended that these PCs should not be connected to global network.
2. Connect a camera unit to the Recorder PC. If the camera requires specific software, install them.
Install SimpleGazeTracker to the Recorder PC.
4. Set a head- and chin-rest in front of a participant. Recording without a head- and chin-rest is not recommended. Place the camera in front of participant's left or right eye (Figure 1). The vertical level of the camera was lower than the eye so that the camera did not disturb the participant viewing the display. If the camera need a separate light source, place it in front of the participant. The lighting should not be on-axis to avoid red eye.
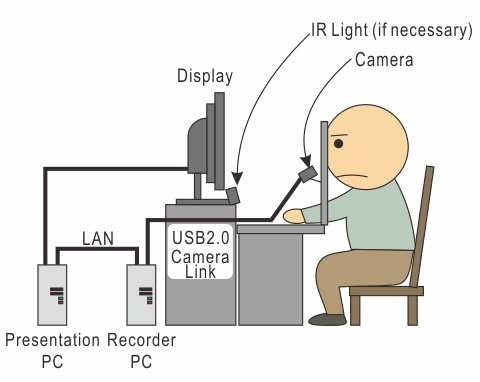
Figure 1
Figure 2, 3 and 4 shows an example of setting. The camera unit is IMPEREX ICL-B0620. The head- and chin-rest are made of angle steels. The camera is mounted on the head- and chin rest. An IR LED lighting is placed below the display.
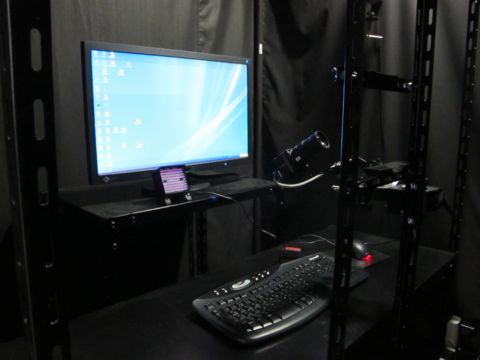
Figure 2
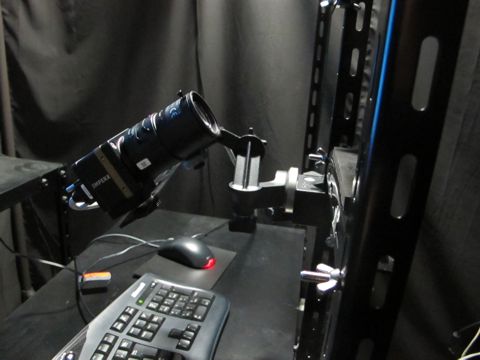
Figure 3
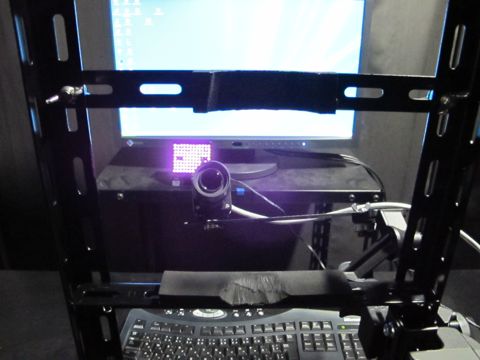
Figure 4
Adjusting camera (monocular recording)
Start SimpleGazeTracker and confirm that camera image is presented on the display of the Recorder PC. If SimpleGazeTracker does not start, please confirm that the camera unit is recognized by the Recorder PC (see instruction of your camera device). If no camera image is appeared nevertheless SimpleGazeTracker seems to be running, please make sure that you have properly positioned the light source.
Ask your participant to sit on a chair and put his/her head on head- and chin-rest. Adjust the position and the orientation of the camera so that either left or right eye of the participant is captured as large as possible.
Adjust parameters for detecting the pupil and the first Purkinje image using the up, down, left and right cursor keys on the keyboard (see Calibration procedure for key bindings). Note that you can forward the camera image to the Presentation PC and use the keyboard of the Presentation PC if you are going to record your eye movement alone. The meaning of the parameters are following.
- PupilThreshold
Suppose that the area darker than this value in the camera image may be the pupil. This value have to be adjusted for each participant.
- PurkinjeThreshold
Suppose that the area brighter than this value in the camera image may be the first Purkinje image. Usually, this value doesn't have to be modified after it has been set up once because this valude mainly depends on the camera and the light source.
- MinPupilWidth
Areas narrower than this value is not considered as the pupil. Unit of the value is percentage of camera iamge width. For example, if camera iamge width is 320 and MinPupilWidth is 10, width of the pupil image must be greater than 32 (10% of 320) pixels. Usually, this value doesn't have to be modified after it has been set up once because this valude mainly depends on camera settings.
- MaxPupilWidth
Areas wider is longer than this value is not considered as the pupil. Unit of the value is percentage of camera iamge width. For example, if camera iamge width is 320 and MinPupilWidth is 10, width of the pupil image must be greater than 32 (10% of 320) pixels. Usually, this value doesn't have to be modified after it has been set up once because this valude mainly depends on camera settings.
- PurkinjeSearchArea
Specify the size of the area to explore the first Purkinje image. This value may be adjusted for each participant.
- PurkinjeExcludeArea
Specify the distance from the first Purkinje image for re-fitting ellipse to the pupil. See Measurement principle of SimpleGazeTracker for detail.
- MorphologicalTrans
Morphological transformation if this value is greater than 1 (closing) or smaller than -1 (opening). Absolute value of this parameter corresponds to kernel size of the transformation. There are cases where small dark areas such as eyelash can be removed by adjusting this parameter. See Changes in pupil detection (version 0.11.1) for detail.
- Intensity (only for OptiTrack V100R2)
Adjust intensity of the embedded IR LED lighting.
- Exposure (for OptiTrack V100R2, V120Slim)
Adjust exposure duration of the camera unit.
Run SimpleGazeTracker on the Recorder PC and inspect the camera image. Figure 5 shows an example of good recording condition. The pupil is colored in blue and the first purkinje image is marked.
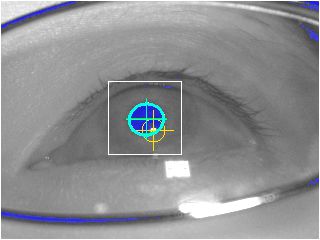
Figure 5
If the area around the pupil is also colored in blue (Figure 6), the threshold for detecting pupil is too high. Decrease PupilThreshold. Otherwise, adjust settings of the camera (such as shutter speed) and/or the light source.
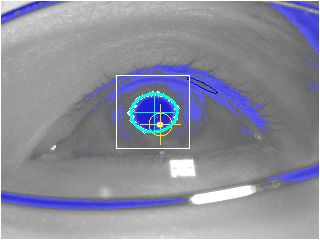
Figure 6
If only a part of the pupil is colored in blue (Figure 7), the threshold for detecting pupil is too low. Increase PupilThreshold. Otherwise, adjust settings of the camera (such as shutter speed) and/or the light source.
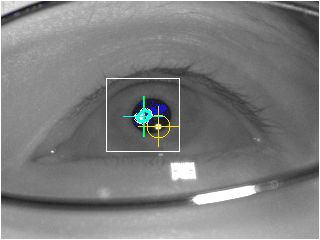
Figure 7
In the following example (Figure 8), the camera is so distant that facial parts besides the eye are also captured. Such settings may decrease recording speed because the SimpleGazeTracker has to reject non-pupil dark areas. Furthermore, small pupil image decrease recording quality because it is difficult to estimate pupil center accurately. Please adjust camera position and/or change camera lens.
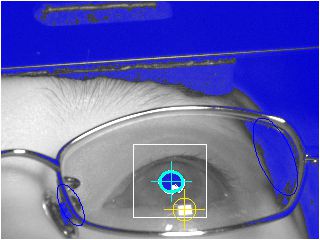
Figure 8
In the following example (Figure 9), the camera is not properly focused on the pupil. In addition, the lens of the eyeglasses is not clean.
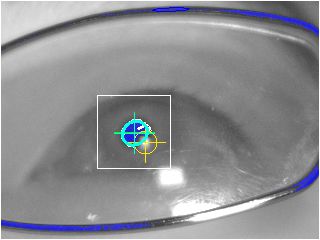
Figure 9
In the following example (Figure 10), reflection of the light source on the eyeglasses hides the pupil. Position of the camera and the light source have to be adjusted. Note that the eyeglasses sometimes slips down while recording, resulting in a condition similar to this example.
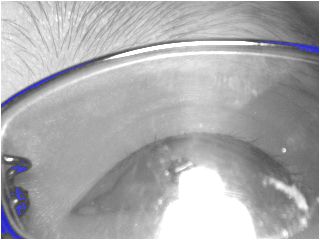
Figure 10
The size of the PurkinjeSearchArea (white rectangle in the camera image) should be large enough to include the first Purkinje image within it. In the case shown in Figure 11, PurkinjeSearchArea may be so small that the first Pukinje image may move out from the PurkinjeSearchArea when participant looked on the corner of the display.
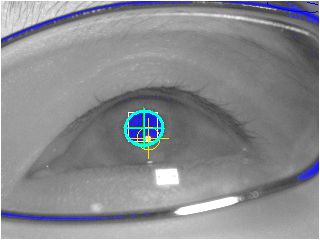
Figure 11
On the other hand, detection of the first Purkinje image maybe failed if the size of the PurkinjeSearchArea is too large. In the case shown in Figure 12, a reflection of the light source on the eyeglasses is erroneously marked as the first Purkinje image.
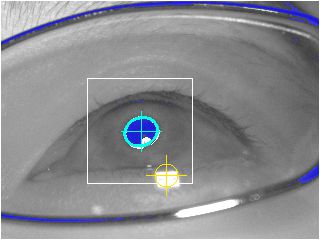
Figure 12
PurkinjeExcludeArea (yellow circle) may be too large in the example shown in Figure 13. More thean the half of the contour of the pupil should be outside of the yellow circle.
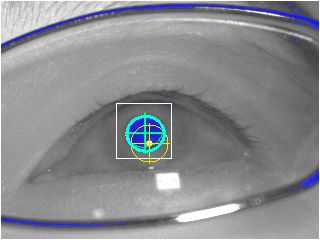
Figure 13
In the following example (Figure 14), the contour of the pupil may be move out from the camera image. The position of the camera must be adjusted.
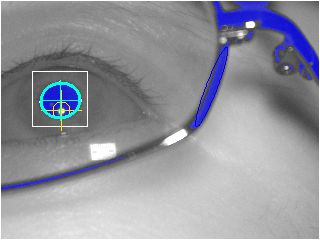
Figure 14
New in 0.5.1 If SHOW_DETECTIONERROR_MSG option in the SimpleGazeTracker is set to 1, an error message is overlaid on the camera preview image (Figure 15).
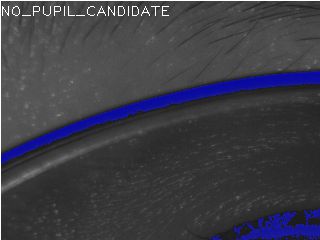
Figure 15
Message |
Description |
|---|---|
NO_PUPIL_CANDIDATE |
No pupil candidates was found. |
MULTIPLE_PUPIL_CANDIDATES |
Multiple pupil candidates were found. |
NO_PURKINJE_CANDIDATE |
At least one pupil candidate was found, but there was no candidate for the first Purkinje image. |
MULTIPLE_PURKINJE_CANDIDATES |
At least one pupil candidate was found, but multiple candidates for the first Purkinje image were found. |
NO_FINE_PUPIL_CANDIDATE |
A pair of pupil candidate and candidate for the first Purkinje image was found, but re-fitting ellipse to the pupil was failed. |
Setting region of interest (ROI)
New in 0.5.1
If camera's field of view is too wide to capture eye only, you can set 'regions of interest (ROI)' to restrict image area where SimpleGazeTracker searches pupil and the first Purkinje image. To set ROI, set non-zero positive integer to ROI_WIDTH and ROI_HEIGHT options in the SimpleGazeTracker configuration file. In the following example (Figure 16), size of camera image is 640x480 and ROI_WIDTH and ROI_HEIGHT are set to 320 and 240, respectively. Thin white rectangular frame represents the ROI. The center of the ROI is fixed at the center of camera image. Note that dark areas outside the ROI are not colored blue. This indicates that SimpleGazeTracker ignores these areas.
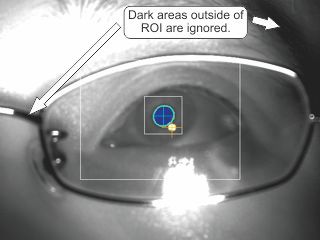
Figure 16
When SimpleGazeTracker is requested to send camera preview image, SimpleGazeTracker sends image only inside of the ROI. Therefore, IMAGE_WIDTH and IMAGE_HEIGHT of GazeParser.TrackingTools configuration file must be equal to ROI_WIDTH and ROI_HEIGHT, respectively. Figure 17 shows camera preview on the Recording PC when camera position and ROI settings are the same to those for Figure 16.
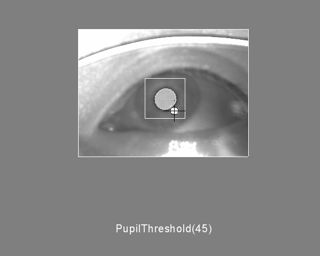
Figure 17
重要
Generally to say, cutting out 320x240 image from an image captured by 640x480 camera is not better than an image captured by 320x420 camera if the sensor size of the cameras are the same. If possible, it is recommended to change camera or lens rather than using ROI.
Changes in pupil detection (version 0.8.0)
In former versions than 0.8.0, too-large or too-small dark area is judged by length of the contour of that area. For example, if MAXPOINTS = 240 and MINPOINTS = 60, length of the contour must be longer than 60 pixels and shorter than 240 pixels. This method is simple and quick, but not intuitive to adjust. Moreover, appropriate values of MINPOINTS and MAXPOINTS depend on camera image size.
In 0.8.0, MINPOINTS and MAXPOINTS are replaced with MIN_PUPIL_WIDTH and MAX_PUPIL_WIDTH. MIN_PUPIL_WIDTH and MAX_PUPIL_WIDTH specify width of the pupil image relative to camera image width. If MIN_PUPIL_WIDTH = 15 and MAX_PUPIL_WIDTH = 25, for example, pupil width must be wider than 15% of camera image width and narrower than 25% of camera image width.
In addition, in 0.8.0, relative numbers of dark pixels in the fitted ellipse is used to judge pupil candidates. If less than 75% of pixcels of the fitted ellipse are darker than THRESHOLD paramter, this ellipse is removed from pupil candidates. This modification improve rejection of non-pupil ellipse such as nose pad of eyeglasses.
Changes in pupil detection (version 0.11.1)
SimpleGazeTracker version 0.11.1 has a new parameter named "MorphologicalTrans" (MORPH_TRANS in the CONFIG file). At the first step of pupil detection, camera image is binarized with PupilThreshold. If MorphologicalTrans is greater than 1, morphological closing is applied to the binalized image. This operation has a possibility of removing small dark areas created by eyelashes (Figure 18). The value of MorphologicalTrans corresponds to kernel size of closing, and the effect of closing depends on the kernel size.
If MorphologicalTrans is less than -1, morphological opening is performed instead of closing. In this case, absolute value of MorphologicalTrans corresponds to kernel size. Because closing brings better result than opening in many cases, it is recommended to try closing first.
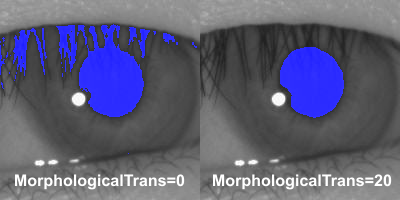
Figure 18
